Crash Course Delphi, part 3: Properties and Events

Time to bring some life into our Delphi project.
Let's change the properties of some of the components: their caption, color, size, font, and so on. And let's add just a little bit of code. Finally, I hear you sigh... isn't that all is programming about...? But Delphi is at least as much about components and their properties!
The Object Inspector: Properties and Events
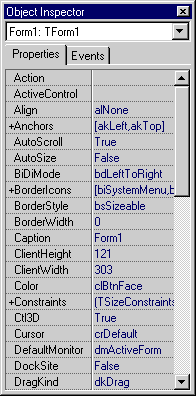
- In the Object Inspector you can change the properties of the components at design time.
If you don't see the Object Inspector, open it thru' the command in the View menu, or press
key F11.

- Make sure that Form1 is selected in the Object Inpector, as shown in the picture above
(select Form1 in the Inspector's listbox). Then, click on the Caption property and type: Foot2Meter Simplified. The text in the title bar of the "form" (the window) changes as you type.
- On the form, click Label2, in order to select it. In the Object Inspector, change the label's Caption to equals.
Note: you can also select component Label2 in the listbox on top of the Inspector.
- The names of our components are not very descriptive. Let's at least change the names of the components that
will be used in the program's source code. That is, the components whose properties will
be changed or used when the program is running.
Select Edit1 and change its' Name property to edInput.
Likewise, change the names of the following components:
Label1 : lblStartUnit
Label3 : lblResult
Button1 : btnFootToMeter
Button2 : btnMeterToFoot
- Change the Caption of btnFootToMeter to: Foot -> Meter
- Change the Caption of btnMeterToFoot to: Meter -> Foot
- Change the Text property of edInput to 1. This assures that the program has a valid value to start
working with.
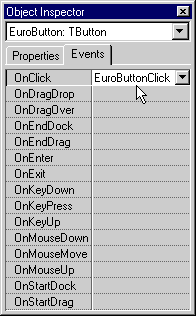
- In the Object Inspector, you also indicate the events to which a component should respond.
Select btnFootToMeter. Next, select the Events tab of the Inspector: you'll see the events OnClick, OnEnter,...
- Double-click in the white field to the right of the OnClick event. Delphi will write btnFootToMeterClick into this field. That will be the name of the Event Handler, the routine
that is executed each time btnFootToMeter is clicked.

- In the Editor, Delphi has already created a template for this Event Handler:
procedure TForm1.btnFootToMeterClick(Sender: TObject);
begin

end; |
- Let's experiment for a moment with some (temporary) source code. Between the words begin and end of
the Event Handler, you type the code to be executed when the button is clicked:
lblStartUnit.Caption := 'foot';
lblResult.Caption := edInput.Text;
The entire Event Handler should read as follows:
procedure TForm1.btnFootToMeterClick(Sender: TObject);
begin
  lblStartUnit.Caption := 'foot';
  lblResult.Caption := edInput.Text;
end; |
Attention! The word foot is between single quotes, not double quotes!
- Compile and run the program. Type something in the Edit-box and click the first convert button: the text 'foot'
appears in lblStartUnit and the text of the Edit-box appears in lblResult. In Delphi-language:
- the string 'foot' is assigned to the property Caption of a label component;
- the property text of edInput is assigned to the property Caption of another label component.
- Stop the application and save the project (Save All).
|
|


